Audit User and Group Permissions Across Apps in Microsoft Dynamics 365 Business Central v28

With Business Central 2026 release wave 1 (v28), Microsoft introduces a powerful new capability — the Permissions Overview page, providing a centralized view of permissions across all apps and extensions.

This feature significantly improves how administrators analyze, audit, and troubleshoot security configurations in complex environments.

In earlier versions, analyzing permissions was fragmented and time-consuming:

  • Permissions spread across multiple apps and extensions
  • No single view to understand who has access to what
  • Difficult to trace Which permission set grants access and Which users or groups are assigned.

What’s New in BC28?

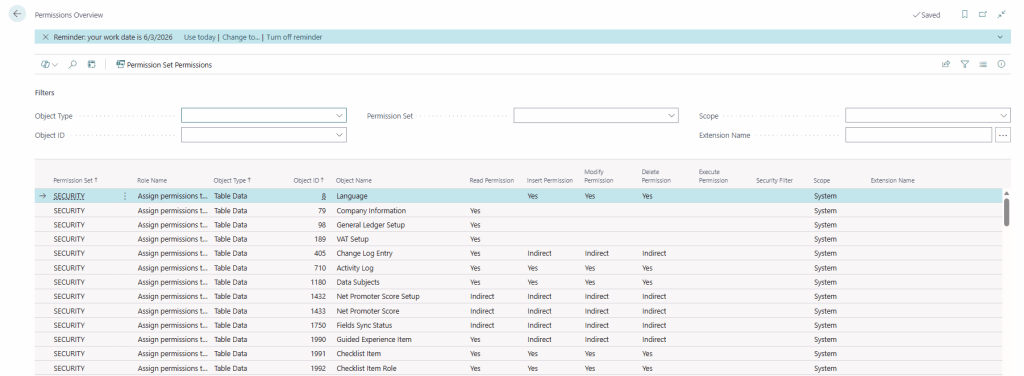
The Permissions Overview page provides a unified and centralized view of all permission sets across:

  • Base application
  • Installed extensions
  • Custom apps

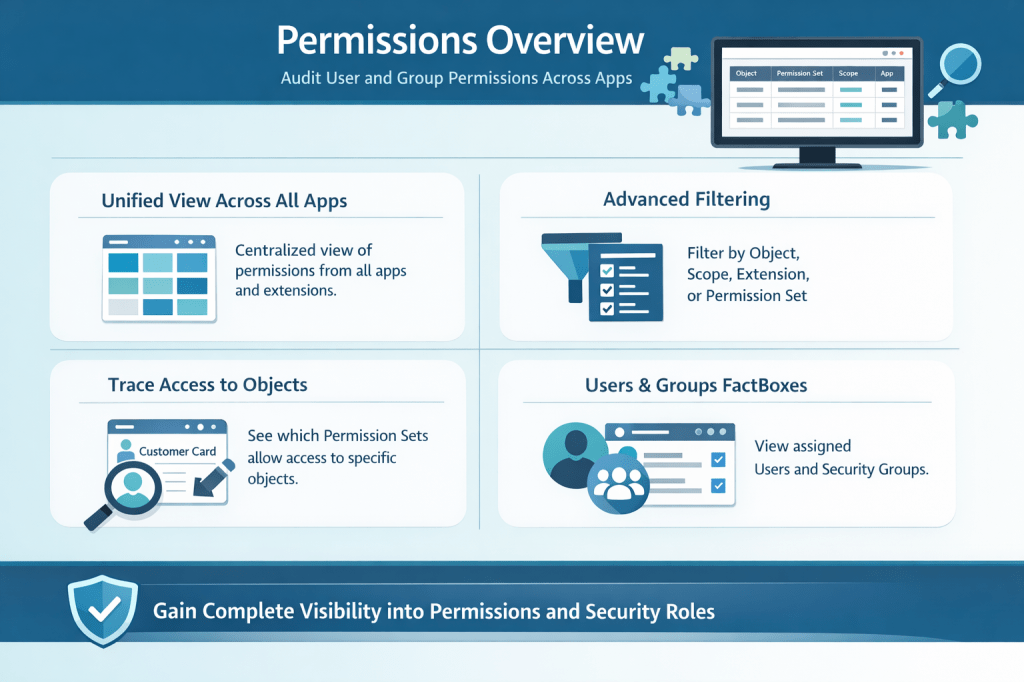
1. Unified View Across All Apps

The Permissions Overview page provides a centralized view of permissions across all apps and extensions, eliminating the need to navigate multiple sources to understand access configurations.


2. Advanced Filtering

Administrators can efficiently filter permissions by object type, scope, extension, or permission set, enabling quick and precise identification of relevant access rights.


3. Trace Access to Specific Objects

The system allows you to easily determine which permission sets grant access to a specific object, providing clear visibility into how permissions are assigned.


4. FactBoxes for User and Group Assignment

Built-in Fact Boxes display the users and security groups associated with each permission set, offering complete transparency into access assignments.

This will help administrator for

1. Improved Security Auditing

The new Permissions Overview enables administrators to perform faster and more accurate security audits by clearly identifying excessive permissions, detecting unused or redundant permission sets, and validating compliance requirements with greater confidence.


2. Simplified Troubleshooting

When users encounter access issues, administrators can quickly search for the relevant object, identify the required permission sets, and verify user or group assignments, significantly reducing the time required to resolve issues.


3. Better Dependency Analysis

In environments with multiple extensions, where overlapping permissions are common, this feature helps identify conflicts, understand permission dependencies, and avoid duplication, leading to a more structured and maintainable security model.

4. Better Governance and Compliance

This feature supports stronger governance by enabling efficient internal audits, simplifying external compliance checks, and ensuring that role-based access is aligned with organizational policies.


5. Improved Role Design

Functional consultants can design cleaner and more effective permission sets by avoiding over-per missioning and aligning access rights closely with business roles and responsibilities.


6. Enhanced User Management

Administrators gain complete visibility into who has access, why they have access, and through which permission sets, resulting in better control and transparency over user permissions.

The Permissions Overview page in Microsoft Dynamics 365 Business Central v28 is a major step forward in security management and transparency.

It transforms permission analysis from a fragmented process into a centralized, efficient, and user-friendly experience.

Protecting Sensitive Data Made Easier: Introducing ‘Concealed’ Text Field Type in Business Central Wave 2 2025

Data privacy and security have become paramount concerns for businesses across all industries. With increasing regulatory requirements and growing awareness of data protection, organizations need robust yet user-friendly solutions to safeguard sensitive information. Microsoft’s Dynamics 365 Business Central Wave 2 2025 introduces a game-changing feature that addresses this challenge: the new ‘Concealed’ text field type with the innovative Mask Type property.

The Challenge: Balancing Security and Usability

Traditionally, we faced a dilemma when handling sensitive data fields. The existing ExtendedDataType = Masked property offered security by displaying field values as dots, but this approach had limitations:

  • Always hidden: Once masked, the data remained permanently concealed, even from authorized users
  • Poor user experience: Users couldn’t verify entered data, leading to potential input errors
  • Limited flexibility: No option to reveal data when legitimate access was needed

These limitations created friction between security requirements and practical usability, forcing developers to choose between protecting sensitive data and maintaining a smooth user experience.

Business Central Wave 2 2025 introduces the new MaskType enum property, revolutionizing how we handle sensitive data display. This property offers two distinct values:

MaskType Values Explained

None (Default)

  • Standard behavior where field values are fully visible in the UI
  • No masking or concealment applied
  • Suitable for non-sensitive data fields

Concealed

  • Field values are hidden by default, appearing as masked dots
  • Users can reveal the actual value through an explicit action
  • An interactive “eye” button appears next to the field for toggling visibility
  • Perfect balance between security and accessibility

Implementing the concealed field type is straightforward. Here’s how to configure it in your AL code:

field(50100; "Sensitive Data"; Text[100])
{
    Caption = 'Sensitive Information';
    MaskType = Concealed;
}

When rendered in the UI, this field will display:

  • Masked dots by default (●●●●●●●●)
  • An eye icon button for revealing/concealing the value
  • Smooth toggle animation between hidden and visible states

Supported Field Types

The MaskType = Concealed property works with:

  • Text fields: For sensitive textual information
  • Code fields: For confidential codes and identifiers
  • Decimal fields: For sensitive numeric values with decimals
  • Integer fields: For confidential whole numbers

Supported Page Types

The concealed functionality is available on:

  • Document pages: Sales orders, purchase orders, etc.
  • Card pages: Customer cards, vendor cards, item cards
  • Not supported: List page repeaters and grid controls

The introduction of the ‘Concealed’ text field type with the MaskType property in Business Central Wave 2 2025 represents a significant advancement in data protection capabilities. This feature successfully bridges the gap between security requirements and user experience, providing organizations with a flexible, user-friendly approach to protecting sensitive information.

Stay tuned for more.

Solving Barcode Printing Issues in RDLC Reports – Business Central On-Premise (v25)

When working with barcode printing in RDLC reports on Microsoft Dynamics 365 Business Central On-Premise, I recently ran into an issue that had me stumped for hours — and as it turns out, it all came down to a subtle but critical font installation step.

If you’re using Business Central and your barcodes refuse to show up in your reports (even after installing the right fonts), read on — this might just be your solution.

🚫 The Problem: Barcode Fonts Not Showing in RDLC

Here’s what I tried — the standard advice you’ll find across most forums:

  • ✅ Installed the barcode font (Code 128, Code 39, Free 3 of 9, etc.) on the service tier machine
  • ✅ Installed the same font on the user/client machine
  • ✅ Restarted the Business Central Server/NST
  • ✅ Restarted the entire machine
  • ✅ Checked that RDLC reports were using the correct font name

Still — no barcodes were rendered.

🕵️ The Hidden Detail: “Install for All Users”

After much trial and error, I stumbled across the real fix:

When installing a font on the Business Central service tier (server), you must choose “Install for all users” — not just a regular install.

Here’s why:

  • Business Central’s NST runs under a system account, not your logged-in user.
  • Fonts installed only for the current user aren’t visible to the NST process.
  • Unless the font is registered system-wide, RDLC won’t be able to use it.

Install the Barcode Font on the Server

  • Right-click the font file (e.g., Code128.ttf)
  • Choose ➡️ Install for all users

Install the Font on Client Machine (Optional but recommended)

  • This ensures previews and printed reports render properly when opened locally.

Restart the Server

  • Not just the NST service — a full restart helps Windows fully register system fonts.

It’s always the little things! A simple checkbox — “Install for all users” — was all it took to fix what seemed like a mysterious RDLC issue.

If you’re working with barcode fonts in RDLC reports on Business Central and nothing seems to work, double-check your font installation method — this could save you hours of frustration.

Hope this will help!!!